Taking Apart My LCD Monitor
It was one of the scariest moments of my life, but it had to be done. It takes some guts to take apart a 19" LCD screen that cost $120, but if you keep the multi-touch table in mind, it is worth it. I didn't want to take apart my screen only to find out it doesn't work, so I did a lot of research. A great place to check if your screen will work or not is LumenLab. Make sure your model doesn't have FCC issues, which means there are non-movable components that block the LCD panel. My model was the Acer AL1916W, which worked perfectly.
What you are trying to do here is strip down the monitor until you are left with the LCD panel and the electronics. The LCD panel is just a thin plate of (glass, plastic?) with some ribbon wires attached to the top. The pixels on the LCD panel can turn different colors but are mostly transparent, especially to IR light. So lets get started!
My monitor:

After taking all the screws out I could, it still wasn't coming apart. I used a screwdriver and slowly pried it apart, breaking the little plastic snaps all around it. This was the point of no return and came surprisingly early for this project.

Here is the back of the monitor with the plastic case taken off:
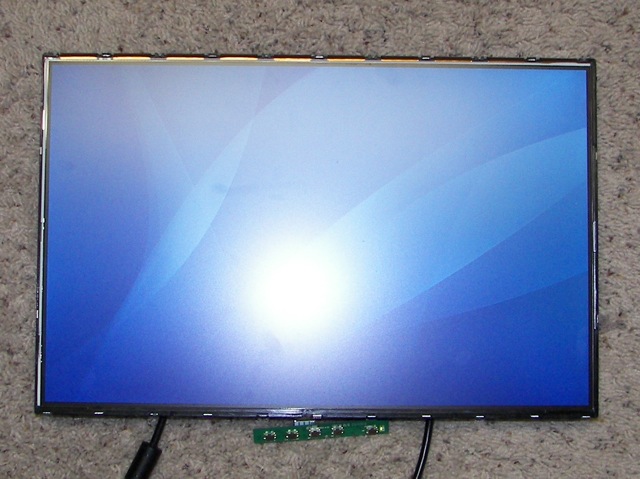
 Here is the front of the monitor. It is actually on right now. The little green dangly thing at the bottom is the controller for adjusting brightness etc. If you look closely you can also see the little gold strips at the top. These are the ribbon wires that are connecting the LCD panel to everything else.
Here is the LCD monitor with the panel lifted away from the backlight.
 I disconnected everything I could from the actual LCD panel (except for the controller), including the power supply.
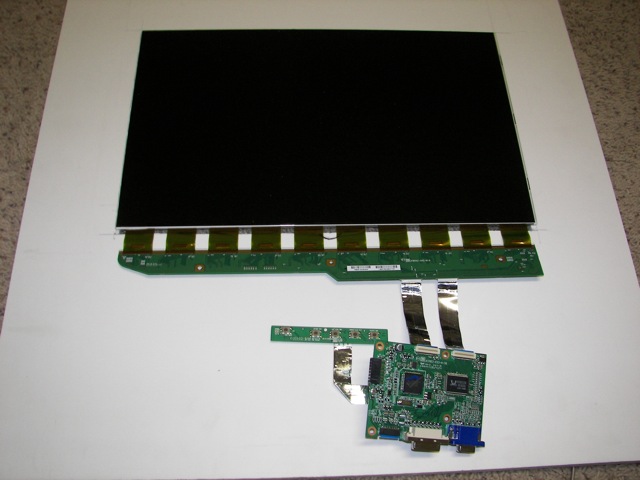
After you take everything apart, you will be left with a lot of extra parts. The sheets of foggy papers are diffusers. For a nice looking picture, you will need to put these between your LCD screen and the backlight to make the light even. I also kept the lights from the backlight, to see if I could use them myself.
Tips: Make sure you don't wear socks or do your disassembly on carpet. In short, keep everything static-free. I didn't, and now I have a few lines of discolored pixels.
Make sure everything is unplugged as you take everything apart. I only plugged it in for a second to reassure myself that nothing was broken yet. Watch out for capacitors too, as they may still be carrying a charge.
When you plug in your monitor to see if it still works, and it doesn't. Don't panic until you try another outlet. The one you are using is dead.
What you are trying to do here is strip down the monitor until you are left with the LCD panel and the electronics. The LCD panel is just a thin plate of (glass, plastic?) with some ribbon wires attached to the top. The pixels on the LCD panel can turn different colors but are mostly transparent, especially to IR light. So lets get started!
My monitor:
After taking all the screws out I could, it still wasn't coming apart. I used a screwdriver and slowly pried it apart, breaking the little plastic snaps all around it. This was the point of no return and came surprisingly early for this project.
Here is the back of the monitor with the plastic case taken off:
Here is the front of the monitor. It is actually on right now. The little green dangly thing at the bottom is the controller for adjusting brightness etc. If you look closely you can also see the little gold strips at the top. These are the ribbon wires that are connecting the LCD panel to everything else.Here is the LCD monitor with the panel lifted away from the backlight.
I disconnected everything I could from the actual LCD panel (except for the controller), including the power supply.After you take everything apart, you will be left with a lot of extra parts. The sheets of foggy papers are diffusers. For a nice looking picture, you will need to put these between your LCD screen and the backlight to make the light even. I also kept the lights from the backlight, to see if I could use them myself.
Tips: Make sure you don't wear socks or do your disassembly on carpet. In short, keep everything static-free. I didn't, and now I have a few lines of discolored pixels.
Make sure everything is unplugged as you take everything apart. I only plugged it in for a second to reassure myself that nothing was broken yet. Watch out for capacitors too, as they may still be carrying a charge.
When you plug in your monitor to see if it still works, and it doesn't. Don't panic until you try another outlet. The one you are using is dead.
Labels: display, LCD, multi-touch
posted by Bridgeyman at
7:04 PM
3 Comments
![]()